• Skip to main content
  • Skip to primary sidebar

I am a Honey Bee

All about my adventures with cooking, crafts, and travel

  • Home
  • About
    • About Me!
    • Press
    • Privacy Policy & Disclosures
    • Contact
  • Recipe Index
  • Exploring
    • Exploring- Florida
    • Exploring- Boston
    • Exploring- Cruises
    • Exploring- New England
    • Exploring- New York City
  • Resources
  • Disney Fun!

diy

Project Life 2013: Week 3

March 5, 2013

PL 2013- Week 3_Full Spread

I have totally been loving Project Life this year. I am not very far behind- just behind on posting- so everyhting is fresh and new for me to keep up with. Plus I have really been trying to make a point of having fun things in there and to do more to jazz up the cards. It is taking more time than last year but I have been enjoying the process.

So without further ado…

Week 3, Left Side:

PL 2013- Week 3_Left Side

When I was jsut taking the picture of the layout I realized that the ingauration photo was actually from 2009 since Sasha was standing on the box & then I noticed the coats. Thanks Google, so helpful that this is one of the to images for the search ‘Obama Ingauration Day 2013’. Well, I have the correct picture ready to print to I’ll make that swap!

Week 3, Right Side:

PL 2013- Week 3_Right Side

This was the week of my birthday, so this half of the page is focused on documenting that. I put in part of the card from my mom in the lower left pocket. The cupcake in the upper left pocket is from my coworker and behind is some journaling that is hidden. It was kinda really bitchy so I didn’t want that to be the focus of the page so I purposefully hid it. Just glad that this allows me to document lifes up’s and down’s.

Stay tuned for Week 4 tomorrow! 🙂

Filed Under: Scrapbooking and Crafts Tagged With: crafts, diy, document, PL2013, Project Life, project life 2013, scrapbooking

How To: Labeling Your Garbage Cans

June 21, 2012

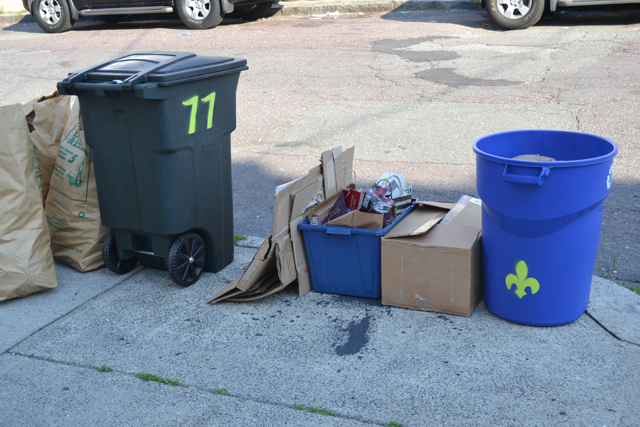
Since we moved in I’ve been saying that I would spray paint the garbage cans so there would be no mix up when we take them to the curb. Everyone else’s is marked so this is not a ‘this is mine, don’t touch it!’ sort of thing. You just never know if your garbage can will go blowing down the city block after it has been emptied. I didn’t just want to freehand spray paint the cans with our house number… I wanted to give them some curb appeal!!


Well, after weeks and weeks of saying I would do it I finally got around to doing it this morning before work. Thankfully, it is super hot now so standing out side at 6am was nice as it was already 80 (I love it!!). We were armed with the stencils I made with my Cricut, but you can even make a stencil by hand or just buy some. We also had some painters tape and some Rust-oleum spray paint. It was pretty easy job and I am happy with how it came out. Still there are some things I would do differently:

  1. Wear gloves. I only put gloves on for the last # and now part of my left hand is bright green even after scrubbing the crap out of them.
  2. Make more stencils. I only made one ‘7’ and one ‘fleur de lis’ thinking I would just reuse it. Unfortunately, it was getting tricky at the end to reuse them and not make a horrible mess on the trash cans & my hands (see above). Should have listened to Pricer!
  3. Mask the stencils differently. I would first position the stencils and then put the mask on. I think it would have allowed me to work easier and get crisper lines as the stencil would have been taped right to the can.
I’ve written out directions below on how I would do it next time. Once I sprayed on the first things I realized immediately the mistakes I made setting us up. Follow the directions below and you will have an easy time labeling your trash cans. 

Curb appeal… I was thinking of doing a pineapple on the trash cans but our mailbox has a fluer de lis already on it so I went with that. Pick a symbol that you like to enhance the overall look!

Damn… we look good!

Labeling Your Garbage Cans

Supplies

  • Stencils, sized to fit your trash cans
  • newspaper
  • scissor
  • painter’s tape
  • gloves
  • spray paint*
  • garbage cans
  • ruler, optional

*I really suggest getting Rust-oleum’s Painter’s Touch Ultra Cover. This works on a variety of surfaces, including plastic, and there were a lot of nice colors. I used Key Lime.

Process
  1. Identify where you want the number and/or symbol to go on the trash cans. Put a strip, or several, of painter’s tape on the trash can to create guides to position the stencils. Use a rule to help center or keep lines level, as needed.
  2. Tape the stencils(s) to the garbage can.
  3. Cut a piece of newspaper the size of the stencil in the center of the piece of paper. Place the newspaper shield over the stencil and tape into place. 
  4. While wearing gloves, evenly and gently spray paint the can at the stencil.
  5. Remove the newspaper shield and the stencil gently. Lastly, remove the tape guides from the trash can.

____________________

Thanks for visiting. Please leave me a comment to provide some feedback. I appreciate all the comments I receive. 

Filed Under: Home Tagged With: curb appeal, diy, fluer de lis, fluer de lis garbage can, garbage cans, home, house, new house, painter's tape, plastic spray paint, Rust-oleum, spray paint, trash cans, trash day

Project Life 2012: Weeks 9 + 10

April 6, 2012

So Project Life has taken a bit of a back seat to REAL LIFE. Things have been so hectic since we put an offer on a place on the 25th. It was countered and we accepted that and then things started to get a little crazy. We had our inspection on Tuesday the 27th, the appriasal was on the 30th, and we signed the P&S documents last night. crazy!!!

I enjoyed this past week since I was able to play around with Project Life a bit more. I’ve been relishing the fact that I got to trim fun paper, not filling out papers with our info. Slipping photos and paper into the page protector pockets… pure bliss. I always feel a sense of accomplishment when I fill a pocket.

So real life is taking us to CT this weekend. I’m looking forward to seeing family and having more fun things to add to Project Life!!

Week 9

Full Spread

Left Side


Right Side


Week 10

Full Spread

Left Side


Right Side


Filed Under: Scrapbooking and Crafts Tagged With: diy, fun things, page protector, Project Life, Real Life, scrapbooking

Primary Sidebar

EMAIL NEWSLETTER!

Sign up HERE for meal planning suggestions & tips to take a great trip!

Top Posts & Pages

  • Chocolate Chip Pudding Cookies
    Chocolate Chip Pudding Cookies
  • Meghan Markle's Zucchini Pasta Sauce
    Meghan Markle's Zucchini Pasta Sauce
  • Room Review: Cars Family Suite in Disney World's Art of Animation Resort
    Room Review: Cars Family Suite in Disney World's Art of Animation Resort
  • Easy Pepperoni Pizza Roll Ups
    Easy Pepperoni Pizza Roll Ups
  • The Ultimate Weekend Away Packing List for Babies and Toddlers
    The Ultimate Weekend Away Packing List for Babies and Toddlers
  • How To: Labeling Your Garbage Cans
    How To: Labeling Your Garbage Cans
  • Pistachio White Chocolate Chip Pudding Cookies
    Pistachio White Chocolate Chip Pudding Cookies
  • Southwest Orzo Salad with a Cilantro Lime Vinaigrette
    Southwest Orzo Salad with a Cilantro Lime Vinaigrette
  • Broccoli Cheddar Soup for Two!
    Broccoli Cheddar Soup for Two!
  • California Chicken Salad
    California Chicken Salad
collage of recipes of common ingredients
collage of soup stew and chilis bowls

Follow Us

Copyright© 2023 · Brunch Pro Theme by Feast Design Co.


Loading Comments...
 

You must be logged in to post a comment.