• Skip to main content
  • Skip to primary sidebar

I am a Honey Bee

All about my adventures with cooking, crafts, and travel

  • Home
  • About
    • About Me!
    • Press
    • Privacy Policy & Disclosures
    • Contact
  • Recipe Index
  • Exploring
    • Exploring- Florida
    • Exploring- Boston
    • Exploring- Cruises
    • Exploring- New England
    • Exploring- New York City
  • Resources
  • Disney Fun!

Uncategorized

In the know, according to Brian Poe

March 13, 2011

Last Tuesday I took a cooking class at Boston Center for Adult Education called “The Dishes You Need to Know with Chef Brian Poe”. I wanted to take this class because Brian was teaching it but also because it focused on learning  how to approached several dishes with just a few ingredients. This taught us how to be creative with a few things and see how they can be used in multiple ways.

oranges made an appearance in salsa, as well as sangria

one of the main components in the dishes being prepared was duck. We put basil, hydrated chipotle pepper, lime juice and a slice of orange on it. This was my first time working with duck, in fact I had not patten it much before this.

Brian working on a red wine sauce.

Hello sangria! (glass #1)

Vinaigrette | duck

Under cress

Plating the first course

First Course- duck with israeli cous cous that was tossed with some vinaigrette served under cress

making tacos | the class

Taco course- duck taco with undergress, salsa, and queso fresco. I charred the tortillas over a gas burner.

Sangria glass #2 and #3… I ended up having 4 that night. Gotta love Tuesdays!

Main course- Duck served with a cous cous risotto, salsa, and red wine sauce

Dessert course- dessert nachos… a play on nachos that was made with totillas that were fried in duck fat (previously done at The Rattlesnake) and coated in cinnamon and sugar. Tortila chips were served with a “rice” pudding that was made with cous cous and topped with salsa.

Filed Under: Uncategorized Tagged With: BCAE, Boston Center for Adult Education, Brian Poe, cooking class, cous cous, duck, sangria, tacos

Maple Walnut Oatmeal Cookies

January 23, 2011

I recently went to a new farmer’s market, Somerville Winter Market, and I picked up a bottle of pure maple syrup from Vermont. I just needed something to do with it, besides pancakes and waffles. Luck would have it that I came across a contest that required maple syrup to be incorporated into the recipe.

I bugged Price endlessly about what I should make… something sweet? something savory? make a bread? cake? dinner entree? sandwich? what????? I feel I went a little safe with the oatmeal cookie but it just works so well. A little drizzle of maple syrup works perfectly over a bowl of steaming hot oatmeal. So I went with the “keep-it-simple-stupid” approach when I decided to make a cookie.

These cookies are soft, chewy and studded with crunchy walnuts. The maple flavor is pronounced without being ‘Hey I’m a Maple Cookie!’. The taste reminds me of fall days. It is the perfect kind of cookie to enjoy with a glass of milk or cup of tea.

Maple Walnut Oatmeal Cookies

yields 3 dozen cookies

Ingredients

  • 1 cup whole wheat flour
  • 1 teapoon baking soda
  • 1/2 teaspoon salt
  • 2 sticks of unsalted butter, softened
  • 1/2 cup light brown sugar
  • 1/4 cup granulated sugar
  • 2 eggs
  • 2 teaspoons vanilla extract
  • 1 cup pure maple syrup
  • 4 cups quick cooking coats
  • 1 3/4 cup chopped walnuts

Process

  1. Preheat over to 350 degrees. Line baking sheets with parchment paper.
  2. Sift together the flour, baking soda, and salt.  Set aside.
  3. Cream together butter and both sugars until light and fluffy. Add eggs, one at at time, until combined. Add vanilla extract and maple syrup to butter mixture.
  4. Mix the flour mixture into the wet ingredients. Once the flour is incorporated, add the walnuts and oats and gently mix until combined.
  5. Spoon 1 1/2 inch rounds on to baking sheets. Bake for 10-12 minutes, until golden brown. Let cookies cool for 2 minutes prior to removing from sheet (otherwise they will crumble), let cool on a rack.

____________________

Thanks for visiting. Please leave me a comment to provide some feedback. I appreciate all the comments I receive.

Filed Under: Uncategorized Tagged With: Baking, contest, cookies, King Arthur Flour, maple syrup, oatmeal, oatmeal cookie, walnut

Mixed Berry Jam

September 29, 2010

A few weeks ago I wrote about the Canning Adventure that Emily and I had. Fruit was smashed, pounds of sugar was used, some lots of wine was consumed, and jam was made. Oh, how can I forget about that small kitchen fire? That alone is why Price tends to run away when the 2 of us are together. 

This was a major refresher in math skills. The original recipe called for 1 single fruit in quarts. Well we had to make it difficult by using 2 fruits in various containers. This involved looking for conversion tables online as well as harassing Price and his friend Chris for confirmation that we did it correction. Conclusion… “math is hard”

Prior to canning, I got 2 books that I found really helpful. We used Better Home and Garden’s You Can Can for this first canning adventure. It is a step-by-step book that really breaks down the canning and preserving process using photographs, tables, and clear instrcutions. I REALLY suggest this book for first time canners because it explains the process and the reasoning behind various things. For example, when to use boiling-water canning vs pressure canning. Hint: it has to do with the pH level of the food. This book, and the wine we consumed, made canning really fun.

Not to toot our horns too loudly, but this jam was pretty damn amazing. The texture was even with crushed fruit, while still having some rather large pieces of blackberries. Getting a spoonful with a large blackberry in there to spread over some toast was amazing. The combination of fruit works really well together- raspberries add a bit of a tangy bit that holds itself against the rich blackberry, which the blueberries mellow that flavor out a bit. It is a rather sweet jam so you could cut that with a bit of lemon juice (2 tablespoons added to the fruit prior to processing).

Mixed Berry Jam

Prep Time: 35 Minutes Process: 5 Minutes Makes: 8/9 Half Pint Jars

1 pint of blueberries
3 6oz packages of raspberries
3 6oz packages of blackberries
7 cups of sugar
1 1.75 packet of pectin

Wash and clean all fruit.

Combine the blueberries, raspberries, and blackberries. In a LARGE pot, add 1 cup at a time, smash* the fruit together. Continue until all fruit is smashed. Stir in the pectin.

Heat over a High heat, stir constantly, until the mixture is at a rolling boil. Add the sugar all at once. Return to a rolling boil; boil for 1 minute, stir constantly. Remove from heat and skim off foam with a metal spoon.

Immediately ladle jam into hot, sterlized janning cars. Leave 1/4″ inch headspace. Wipe jar rims, place lid on jar and screw on bands (so they are secure but not too tight).

Process jars using the boiling-water method for 5 minutes (start timing when the water returns to a boil). Remove jars and cool on a wire rack, just not directly on your counter.

*A potato masher works well. Or improvise, like we did.

Filed Under: Uncategorized Tagged With: Ball Jars, blackberries, blueberries, Canning, jam, pectin, raspberries, sugar

Calzones

September 19, 2010

Calzones are pizza’s well packed cousin. Everything fits nicely into the crusty pocket. Once you break into time you watch the lovely, melted cheese coming flowing out. You can just have a cheese calzone but it’s like cheese pizza- very lonely. So along with the cheese you can add in pepperoni, mushrooms, ham, jalapeños, olives, sausage…. the possibility are endless.

Personally, I love them because you dip pieces into tomato sauce. And since I LOVE ketchup I think this act of dipping into another tomato medium is pretty damn awesome. Because you are dipping into the sauce you want to make sure it stands up again the rest of the calzone. You can use a home made sauce or a jarred sauce. The real key is to get something thin so it evenly coats the calzones, instead of a chunky sauce.

I go as far as to add a tiny bit of sauce in my calzone. I know, so crazy! I

The same goes for the dough… both store bought or home made works perfectly. If you are pressed for time just get store bought. I think that the key thingwhen you are using store bought it so let it sit out and get warm. Messing with chilly dough just results in holes since the dough has not loosened up yet. That goes for homemade as well, but I think it’s even worse with store bought.


Calzones

pizza dough (store bought or home made)
tomato sauce
mozzarella cheese
optional add ins: (turkey) pepperoni, canned or cooked mushrooms, ham, bacon, olives, endless possibilites
Preheat oven to 450 degrees.
Divide dough into even sides portions. Stretch out dough into rectangular or circular shapes.
Add in the filling you desire leaving enough room at the edges to pinch together to seal calzone.
Cook for 20+ minutes*
Let cool so the middle is not boiling lava hot and enjoy with tomato sauce.
*Cooking time depends on the size of calzone and your oven.


Filed Under: Uncategorized Tagged With: calzones, cheese, dough, mushrooms, pizza dough, tomato sauce

50 pounds of tomatoes

August 30, 2010

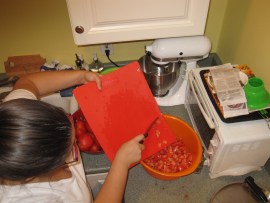
I think I have my mojo back. At least I did this weekend. Price and I got up early and went to Haymarket to get tomatoes for sauce and veggies for the buns. I knew I wanted to make a lot of sauce and I wanted it fresh so we went to Haymarket to get a lot of tomatoes. Well a lot is an understatement. I did not feel like getting bags of tomatoes by picking out each tomato, so we went to area where they have a boxes of tomatoes. Well did you know that they are 25 pounds each? I did not, but that did not stop my from swallowing my fear and buying 2 tomato varieties. 25 +25 = 50 pounds!

So we dropped it off and I ended back out to the store to the quart size Ball jars, meat for meatballs, and some other stuff. Once I was back home I started cutting, and cutting, and cutting. It seemed like it was never ending but was relaxing and worth it. My feet were sore by the end of the day from standing at the stove for hours on end but I love that kinda of pain. Like working out at the gym and being sore later on.

Well all of these tomatoes yielded about 22/23 quarts of marinara sauce. Even though I just bought a pot for this I had to use another because we had soo much! I had bought a 20 quart stainless steel pot last weekend and it was put though a very food first test. It passed with flying colors since nothing burned, it held heat evenly, it held heat well, and it was easy to clean. Loved it.

Besides the marinara sauce Price and I made meatballs using 4 pounds of meat (beef and pork), onion, parsley, breadcrumbs, cheese, 5 eggs, crushed red pepper, salt, and pepper. I also used a package of hot and sweet Italian Sausage. Since you can’t put meat into sauce and can it (well maybe you can, I just head you can’t so I am not about to question it) we divided the sauce up for canning and freezing. I froze the meatballs that we will eat with the jarred sauce.

Every time we heard a lid pop we counted down with the # remaining that needed to pop and we would then cheer. I think canning is going to turn into a new addiction. I love how the process, the popping, and how I have all that sauce and I still have room in my freezer. I now have 14 happy quarts sitting in my cabinets.

I’m hoping this productivity carries over into the week since I have scrapbooking to do and clean up and an office to rearrange.

Filed Under: Uncategorized Tagged With: Ball Jars, Canning, Haymarket, marinara sauce, sauce, tomato

Tangy Turkey Burgers

May 7, 2010

When I was younger I somehow talked my dad into signing up for some monthly recipe cards. To me this was the most exciting mail ever. New recipes every month for me to sort  and collate into the deck and pick recipes from. I imagine that to him it was just another bill to pay. I think that in the end it was the most expensive ‘cookbook’ known to man.

At least I can say that the recipe cards did not go unused. Two of the cards that always remained rotated from the deck for easy access were recipes for a veggie lasagna and turkey burgers. The recipe called Tangy Turkey Burgers were by far my favorite. The recipe produced great tasting juicy burgers that I fell in love with.


I generally won’t argue with people who say that turkey burgers are dry since they often are but these burgers are far from dry.  Turkey is a lean so the lack of fat makes it dry but when you add a marinade to the ground turkey it becomes moist and it takes on the bright flavors of the marinade. The soy sauce and ginger bring fresh flavor to the burgers while the Dijon mustard adds a bit of a kick. Since I have made the recipe so many times over the years I have  adjusted the ratios and added fish sauce to it to bring the flavors all together.


The start of our week was a bit hectic since Price was finishing things up for this last college presentation and both of us were sick. I picked this to make since we had all the ingredients at home (with the exception of the fresh rolls), it’s fast and easy, and it would, hopefully, bring back some life to our dead pallets. I have to say that it def did the trick.

Tangy Turkey Burgers

1 pound of ground turkey
2 tablespoons of soy sauce
3 tablespoons of fish sauce
1 tablespoon of minced garlic
1 tablespoon of Dijon mustard
2 inches of fresh ginger, grated
salt and pepper
avocado (optional)
 

Combine the soy sauce, fish sauce, garlic, Dijon mustard and grated ginger into a large bowl.

Add the ground turkey and mix until sauce is incorporated completely.

Cover and place in refrigerator, for at least 20 minutes.

Create 4 equal size patties for grilling. Season patties with salt and pepper prior to grilling.

Assemble turkey burger with on a hearty bun and top with slices of avocado. Enjoy!

Serves 4

Filed Under: Uncategorized Tagged With: burgers, dinnger, ginger, ground turkey, turkey burger

Warning: Highly Addictive “Muddy Buddies”

April 9, 2010

It’s always amusing when I bring cake or other goodies into work or school and I watch people attract to it like a swarm of bees. Buzzing around getting their sugar fix and asking how I made it. I was once carrying around some cake to class and someone stopped me and asked about it. Well I shared some slices with him and a friend and as he ran away with his ‘dinner’ he yelled back to me “Thanks Sugar Fairy!!” (new favorite nickname) Well, this happened again yesterday since we had our monthly staff meeting and I brought in Muddy Buddies.

Not familiar with Muddy Buddies? Maybe you’ve heard of Puppy Chow? Still no? Well, imagine a simple piece of Chex cereal becoming host to a chocolate, peanut butter, and butter mixture, and then covered in powered sugar. This simple had just taking a drastic turn into the realm of high addictive pop in your mouth foods.

Simple to make with just a few ingredients. Some melting, stirring and then shaking. Plus if you do it right (not like me) you won’t have many dishes involved in there. A bowl for melting, a big bowl for mixing, a spoon for mixing. Use a BIG ziploc bag and things are really easy then. If you are making a few batches, or like me using 3 boxes of Chex cereal, then be prepared with a few ziploc baggies. Trust me, it makes it a lot easier to use a few than try to resue them a few times. The recipe said to let the Chex cool down after the bounce in the bag but I felt that mine was not too hot and did not need to be laid out on a parchment paper coated cookie sheet.

Chex Muddy Buddies

9 cups of Chex rice or Corn cereal (or a combination)
1 cup of semi sweet chocolate chips
1/2 cup of creamy peanut butter
1/4 cup of butter
1 teaspoon of vanilla extract
1 /2 cups of powdered sugar

1) In a large bowl, measure cereal, set aside.

2) In a microwave safe bowl, put the chocolate, peanut butter, and butter together. Microwave on High for 1 minute. Stir mixture. Continue to microwave and stir in 30 second intervals until the mixture is smooth. Add the vanilla extract.

3) Evenly pour the mixture of the Chex cereal and mix together until cereal is evenly covered.

4) Transfer to a large (2 gal) resealable plastic bag. Add the powdered sugar, seal, and gently shake until covered.

5) Store in an airtight container in the fridge or freezer.

Filed Under: Uncategorized Tagged With: @ work, Chex cearal, Chex Muddy Buddies Recipe, chocolate, Muddy Buddies, peanut butter, Puppy Chow, snacks

Pineapple Cinnamon Pancakes

February 24, 2010

Pancakes with Grade B maple syrup (no butter)

In honor of National Pancake Day, Price and I had pancakes for dinner last night. I adapted a recipe for pineapple cinnamon pancakes from The Great Big Cookie Book by Hilaire Walden. Apparently pancakes fall under the scone and muffin category in a cookie book, who knew? Well I thought the combination of pineapple and cinnamon was interesting and would be good so I picked them as the pancake to try.


These pancakes turned out to be fluffy, thick, and flavorful. These pancakes were quite dense, which resulted in an airy sponge that soaked up our syrup. (awww we used syrup we got during a trip to VT for one of my birthday’s) Every bite was punctuated with bits of the crushed pineapple. I think that it could have used even more pineapple. The best is that there is little sugar and no butter or oil in the recipe making them a bit healthier and makes them light in texture.

coming together now

This is a large batch of pancakes. We purposefully make large batches of pancakes and waffles so we can freeze them and reheat them later on for a quick breakfast. Then freezing the pancakes separate them with pieces of wax paper before wrapping them up. Separating them will prevent them from becoming a block of pancakes and defrosting/reheating a lot easier.

Pineapple Cinnamon Pancakes

2 cups whole wheat flour
2 cups self rising flour
2 tablespoons baking powder
1 teaspoon salt
1 tablespoon ground cinnamon
3 tablespoons sugar
2 eggs
2 1/2-3 cups milk (I use skim)
8 oz of crushed pineapple*
 

Sift together the dry ingredients into a large bowl.

Mix together the eggs and milk.

Combine the wet ingredients into the dry and mix together. Add in the crushed pineapple and mix. Add more milk if you like thinner pancakes.

Cook pancakes until golden brown.

*If you like pineapple feel free to add more. 8oz is the minimum


Filed Under: Uncategorized Tagged With: breakfast, cinnamon, maple syrup, national pancake day, Pancake, pineapple

the best of both worlds…Donut Muffins!

February 18, 2010

I’m addicted to a show called The Best Thing I Ever Ate on Food Network. I sit on the sofa with my iphone and my yelp app and bookmark the places to eventually go to. One of the latest episodes was featuring Snacks and while several featured places interested me I fell for the donut muffin. I don’t think Price would go for a trip to Downtown Bakery and Creamery in Healdsburg, CA just for a muffin. So what’s one to do…. google, google, google and then bake.


I didn’t find a recipe I exactly loved for a donut muffin so I made mine own. One of the things I wanted to emphasize was vanilla so I used the vanilla sugar and vanilla extract I made.  I now need to make more vanilla sugar but it was worth it. I think they had a great texture like a cake donut but were sweeter like a muffin- hell, being rolled in cinnamon and sugar will make anything sweet.


I made a mix of regular and mini muffins for this batch.  I perfer the mini muffins because they are a great size and I don’t feel as horrible if I have mini compared to a regular one! Plus they are so cute little. The recipe makes about 60 mini muffins. If you make mini muffins you will need to use more butter and cinnamon/sugar at the end because you will have more muffins (and more surface area) to cover.


I should have taken a picture of it ripped open but I was too busy baking and stuffing Pricer full of them. Then I shared some with Emily and froze the rest. The whole point of explaining this is that the inside was beautifully dotted with vanilla. ahh bliss

Donut Muffins

3 cups of self rising flour
1 ½ teaspoon pumpkin pie spice
1 cup vanilla sugar*
⅔ cups shortening
2 eggs
1 cup milk
2 teaspoons vanilla extract

Sugar Coating**

1 1/2 cups of vanilla sugar
1 tablespoon of cinnamon
1 stick of unsalted butter

Preheat oven to 350. Grease muffin tins.

In a large bowl sift together the flour, salt, and pumpkin pie spice, set aside.  Measure the milk and add in the vanilla extract to the measuring cup, set aside.

Cream together the vanilla sugar and shortening together until light and creamy. (be in awe of the vanilla goodness)

One at a time, add the eggs until incorporated.

Alternating with the flour, add the 1/3 of the combined milk and vanilla to the mixture, blend until well incorporated.

Let the batter sit for 15 minutes before dividing it among the tins for baking.

Bake until the tops are golden brown and a tooth pick is clean upon it’s removal. The regular sized muffins will take 20-22 minutes and the mini muffins for 12-15 minutes.

While the muffins are baking melt a stick of butter in a skillet on low. Combine the vanilla sugar and cinnamon together on a plate.

Once the muffins are done and cooled to the touch, quickly roll the muffin in butter coating all sides. Roll the muffin in the sugar mixture.

*Make vanilla sugar by putting sliced and scraped vanilla beans into an air tight container of sugar. The longer is sits the better. I suggest making batches of this and always having it on hang because it is great to add to whipped cream, oatmeal, and other baking recipes. You can even make your own vanilla extract!*

** If you make mini muffins you will need more butter and cinnamon/sugar because of the increased quantity of muffins.

Filed Under: Uncategorized Tagged With: Baking, breads and muffins, breakfast, cinnamon and sugar, donut muffin, food network, the best thing i ever ate, vanilla extract, vanilla sugar

Peanut Butter Cookies

February 12, 2010

My friend Emily asked me what I use for a peanut butter cookie recipe since she wants to try a bacon peanut butter cookie. I think this is genius but what really makes it great is that she has never purchased bacon in her 23 years. Never purchased or cooked meat in fact. She is not a vegetarian but pretty close, except that I have brought her over to the dark side. She tried a big mac after boozy bowling for my 24th birthday. Pretty funny once she spotted a McDonald’s and announced that she wanted a Big Mac so Price had to drive around the block while we ran in. Needless to say Em felt like garbage later.


So back to the peanut butter cookies….. this simple question of “what recipe do you like?” prompted me to yank out several cook books to see what possibilities I had to try compared to my usual recipe. Whenever I have made peanut butter cookies I have used My First Baking Book. My mom got it for me when I was 6 and I have used this book several times even though it is a “kid’s cook book”.  To be quite honest I find it hard to believe that kids will be using puff pastry or making eclairs. What 6 year old makes Pate Choux?? 


This seems to be an easy and pretty standard peanut butter cookies recipe. While going through my cook books I noticed this was pretty close to a few others that I had. I made an addition to it by adding my homemade vanilla extract. I just think that everything should have vanilla extract. Additionally, I made some without chocolate chips and some with.


I’m not a fan of peanut butter cookies. I had 1 with the chocolate chips and it was good. Good texture, good flavor but I really don’t like pb cookies and without a sweet tooth I have had not made it my mission to try to perfect the cookie. Maybe I can work on that now. Either way, Price enjoyed them last night. I brought them into work to see what other’s have to say. Hopefully they will enjoy these and trying different recipes until they have picked the best.

Peanut Butter Cookies

2 sticks of room temperature butter
1 1/2 cups light brown sugar
2 eggs
1 cup of peanut butter
2 tablespoons vanilla extract
2 cups of self rising flour
chocolate chips (optional)

Preheat your oven to 350.

Cream the butter and brown sugar together until light and fluffy.

One at a time, add the eggs.

Add vanilla and peanut butter until batter is smooth.

Add the self rising flour until just incorporated. If adding chocolate chips add them in now.

Place teaspoon fulls onto a nonstick/greased/silicon lined baking sheet.

Bake for 12-17 minutes. Let cool on a rack and then enjoy with milk.

Filed Under: Uncategorized Tagged With: Baking, chocolate chips, cookies, peanut butter, peanut butter cookies

Got Milk? Tres Leches Cake

February 4, 2010


Another staff meeting, another cake. I really love that I make cake for work things. It’s a good way to try new cakes, I try to make a new cake every meeting. A way to keep things fresh and new.


I have wanted to make Tres Leches Cake for a while. I’m not a dessert person but this really makes me have a sweet tooth. The custardy consistency and the frosting really get me hooked. I was always interested in the frosting because its taste reminded me of a marshmallow. Well I learned that it is just heavy cream vanilla extract, and A LOT of sugar, which explains the sugary sweet marshmallow taste.


I search for the perfect recipe had my blog hoping and diving into cook books. In the end I decided to go with the one on Foodnetwork.com by Alton Brown. I picked this one because the frosting had the most sugar in its frosting recipe (how dare someone else tell me that 2 tablespoons is enough?) and I met him!! I was using a bigger pan than the recipe called for. I decided to multiply the recipe by 1.5 for my 11x 14.5″ pan. There were a few things that I played around with like the quantities for the glaze, like I just used 1 can of evaporated milk, 2 cans of condensed milk, and 2 cups of heavy cream (instead of the half and half).


 I think it turned out pretty well. Next time I would poke a few more holes and add the milk mixture in 2 batches so it would soak in it bit at a time. I think pouring all the mixture in at once prevents it from soaking in properly. The mixture did not soak in consistently, it settled in the bottom and soaked up about 4/5 of the way up- which kinda defies gravity. Either the mixture was tasty and the frosting was addicting.

Tres Leches Cake

Vegetable oil
6 3/4 ounces cake flour, plus extra for pan
1 teaspoon baking powder
1/2 teaspoon kosher salt
4 ounces unsalted butter, room temperature
8 ounces sugar
5 whole eggs
1 1/2 teaspoons vanilla extract

For the glaze:

1 (12-ounce) can evaporated milk
1 (14-ounce) can sweetened condensed milk
1 cup half-and-half (or heavy cream)

For the topping:

2 cups heavy cream
8 ounces sugar
1 teaspoon vanilla extract

Directions

Preheat the oven to 350 degrees F. Lightly oil and flour a 13 by 9-inch metal pan and set aside.

Whisk together the cake flour, baking powder and salt in a medium mixing bowl and set aside.

Place the butter into the bowl of a stand mixer. Using the paddle attachment, beat on medium speed until fluffy, approximately 1 minute. Decrease the speed to low and with the mixer still running, gradually add the sugar over 1 minute. Stop to scrape down the sides of the bowl, if necessary. Add the eggs, 1 at a time, and mix to thoroughly combine. Add the vanilla extract and mix to combine. Add the flour mixture to the batter in 3 batches and mix just until combined. Transfer the batter to the prepared pan and spread evenly. This will appear to be a very small amount of batter. Bake on the middle rack of the oven for 20 to 25 minutes or until the cake is lightly golden and reaches an internal temperature of 200 degrees F.

Remove the cake pan to a cooling rack and allow to cool for 30 minutes. Poke the top of the cake all over with a skewer or fork. Allow the cake to cool completely and then prepare the glaze.

 For the glaze:

Whisk together the evaporated milk, sweetened condensed milk and the half-and-half (or heavy cream). Once combined, pour the glaze over the cake. Refrigerate the cake overnight.

 Topping:

Place the heavy cream, sugar and vanilla into the bowl of a stand mixer. Using the whisk attachment, whisk together on low until stiff peaks are formed. Change to medium speed and whisk until thick. Spread the topping over the cake and allow to chill in the refrigerator until ready to serve.

Filed Under: Uncategorized Tagged With: @ work, Alton Brown, cake, cake and cupcakes, mexican cake, milk, tres leche cake

Neiman Marcus Cookies

January 2, 2010

I think everyone has heard of urban legend involving the Neiman Marcus Cookie recipe. The one where the woman loves the cookie soo much that she asks for the recipe and the waiter tells her it is “two-fifty” for it. Little did she know that snooty patooty waiter ment $250. Shocked and pissed customer tries to argue this charge but loose and as a result shares the recipe. Well, all of this is made up, what else is new? In fact, the cookie recipe is on Neiman Marcus’ website, along with several other recipes for dishes they serve in their cafes.

I figured it would be fitting to this famous cookie since I had to urge to bake and this is a classic cookie- except its one that I never tried before. Always a first time for everything. So I made a double batch of these gems to share with the people that Price work with (hell, people working on New Years Day need a treat!) and his poker cigar buddies.

 They were easy to make and produced a nice result. I like cookies that are gooey and chewy, which when I stopped backing were perfectly like that. I even accounted for carry over cooking so they were on the underdone side but when they finished setting up they became fairly crisp. They became cookies that would pair perfectly with a glass of milk. A quick dunk and enjoy. Or in the case of the poker guys… a cold beer and a cookie.

Neiman Marcus Cookies

2 dozen cookies
1/2 cup (1 stick) butter, softened
1 cup light brown sugar
3 tablespoons granulated sugar
1 large egg
2 teaspoons vanilla extract
1-3/4 cups all purpose flour
1/2 teaspoon baking powder
1/2 teaspoon baking soda
1/2 teaspoon salt
1-1/2 teaspoons instant espresso coffee powder
1-1/2 cups semi-sweet chocolate chips

Preheat oven to 300 degrees. Cream the butter with the sugars using an electric mixer on medium speed until fluffy (approximately 30 seconds)

Beat in the egg and the vanilla extract for another 30 seconds.

In a mixing bowl, sift together the dry ingredients and beat into the butter mixture at low speed for about 15 seconds. Stir in the espresso coffee powder and chocolate chips.

Using a 1 ounce scoop or a 2 tablespoon measure, drop cookie dough onto a greased cookie sheet about 3 inches apart. Gently press down on the dough with the back of a spoon to spread out into a 2 inch circle. Bake for about 20 minutes or until nicely browned around the edges. Bake a little longer for a crispier cookie.

Filed Under: Uncategorized Tagged With: chocolate chips, cookies, espresso powder, neiman marcus cookies, urban legends

  • « Go to Previous Page
  • Go to page 1
  • Interim pages omitted …
  • Go to page 9
  • Go to page 10
  • Go to page 11
  • Go to page 12
  • Go to Next Page »

Primary Sidebar

EMAIL NEWSLETTER!

Sign up HERE for meal planning suggestions & tips to take a great trip!

Top Posts & Pages

  • Easy Pepperoni Pizza Roll Ups
    Easy Pepperoni Pizza Roll Ups
  • Chocolate Chip Pudding Cookies
    Chocolate Chip Pudding Cookies
  • Room Review: Cars Family Suite in Disney World's Art of Animation Resort
    Room Review: Cars Family Suite in Disney World's Art of Animation Resort
  • Lemony Raspberry Zucchini Bread with a Lemony Glaze
    Lemony Raspberry Zucchini Bread with a Lemony Glaze
  • Quick and Easy Cabbage Slaw
    Quick and Easy Cabbage Slaw
  • Meghan Markle's Zucchini Pasta Sauce
    Meghan Markle's Zucchini Pasta Sauce
  • Strawberry Dessert Cookie Pizza
    Strawberry Dessert Cookie Pizza
  • Pasta with Shrimp, Corn, Tomatoes, and Zucchini
    Pasta with Shrimp, Corn, Tomatoes, and Zucchini
  • New Haven Style White Clam Pizza
    New Haven Style White Clam Pizza
  • 15+ Tips & Tricks for Enjoying Mickey's Not So Scary Halloween Party
    15+ Tips & Tricks for Enjoying Mickey's Not So Scary Halloween Party
collage of recipes of common ingredients
collage of soup stew and chilis bowls

Follow Us

Copyright© 2026 · Brunch Pro Theme by Feast Design Co.

Loading Comments...

You must be logged in to post a comment.